Wednesday, April 30, 2008
My Final Project/ Portfolio
My name is TJ, and this link will take you to the photos that I presented for my final project in Photography class. http://flickr.com/photos/26149987@N05/sets/72157604813891608/
Tuesday, April 29, 2008


A Photo of a friend of mine and her puppy. I used the soft focus tool in picasa after cropping, red-eye, and straightening.
http://picasa.google.com/support/bin/answer.py?answer=19850&topic=14195


Assignment #9


Friday, April 25, 2008
Ivan does lesson 9, Or I like Geodes
The Original Photograph. Should have set my white balance to florescent...

Cleaned and highlighted photo. Used Photoshop CS3.
Image Adjustments: Up brightness by 20
Add Levels Adjustment Layer and adjust for best color.
Add Brightness/Contrast Adjustment Layer
Mask off everything but the geode. Using the paint brush.
Up the brightness + 50 and the Contrast +10

Did a little modification on the center to make it a little cooler...
Add Hue/Sat Adjustment Layer
Use Polygonal Lasso to select the center.
Sharpen the selection line a little and soften the edge.
Invert the center and mask off the rest so only the center is available.
Adjust the Blues so we have +70 Hue and +25 Sat.

Finally I cut the background out of the picture entirely and removed the stand.
Add a regular layer.
Mask off everything with the paint tool except for the geode. Use Black.
Use Clone Stamp, Brush, Eraser and heal tools to remove the corners of the stand from the bottom.

Wednesday, April 23, 2008
Ivan does lesson 6
Cameras these days work to prevent you from making mistakes, the easy modes and program modes are set to work most of the time. In order to learn to control your camera you need to make it so that it does not take pictures correctly. Create photographs that document and show the following common errors.
1. Subject Blur/Partially Blurry Photographs
 Phone cord moving.
2. Motion Blur/Totally blurry photographs
 Camera moving.
3. Depth of Field/Wrong plane of focus

Notice the plant in the center back left is in focus better the the plant in the center of the picture.
4. Over exposure/Washed out
 Overexposure was taken by accidentally moving 2 stops in the wrong direction for shutter speed to adjust for sunny 16 on an f8 stop.
5. Under exposure/Too Dark
 To many shadows...
6. Incorrect White Balance balance/Wrong color
 Very much the wrong color.
Ivan does lesson 5
Look up three reviews of your camera and summarize their conclusions.
Use http://www.dcviews.com/ to find information on your camera.
List the three review sites and also list three strengths and three weaknesses about your camera to the course web log.
Camera: Canon A720 IS
Use http://www.dcviews.com/ to find information on your camera.
List the three review sites and also list three strengths and three weaknesses about your camera to the course web log.
Camera: Canon A720 IS
Review 1
http://www.megapixel.net/reviews/canon_a720/a720-gen.php
Despite one or two quirks, the overall design of the camera makes its controls intuitive to use and comfortable to hold.
Review 2
http://www.bobatkins.com/photography/digital/canon_powershot-a720is_review.html
Also comfortable to hold. Very good manual controls and size is good. Larger then most small cameras but more flexible.
Review 3
http://www.digitalcamerainfo.com/content/Canon-PowerShot-A720-IS-Digital-Camera-Review-15944.htm
Very technical site. Good for hard info.
Summery
Over all the A720 IS is a good small sensor camera for new photographers as well as a second camera for professional photographers. As long as you are aware of the limitations you can do a lot. The complete set of manual functions is comparable to many professional SLR cameras. It is a good starter camera for beginning photographers, especially for the price. It is compact enough to be portable yet it has a good grip on the right side for one handed photography. There are accessory lenses available as well for wider format or telephoto. I like it, its a very good value for the price.
Strengths
The hand grip is very good for 1 handed shoots.
Extensive array of manual controls.
The image stabilization system is very effective.
Very good color and white balance in most conditions except tungsten.
Weaknesses
Does not do RAW
28mm lens would be nice to have.
Poor color performance under tungsten lighting. Recommended to use tungsten mode in this case.
Picks up a lot of noise at high ISO. Recommended to keep ISO low for best quality shots.
Ivan does lesson 4
Answer the following questions about your camera: Canon PowerShot A720 IS
How do you adjust the ISO?
Auto: Func. Set (first item selected on left side of display) > Use left and right to select Auto or High ISO.
Manual: Func. Set (first item selected on left side of display) > Use left and right to select 80 100 200 400 800 or 1600 ISO.
How do you adjust white balance?
Auto: No Settings
Manual: Func. Set Use down arrow once to select white balance > Use left and right to select Auto, Daylight, Cloudy, Tungsten, Florescent, Florescent H, Underwater and Evaluate Mode.
How do you set exposure compensation?
Auto: None
Manual: Func. Set Use down arrow 4 times to select Flash Output. Power settings are 1/3, 2/3 and Full.
TV and AV Modes: You can set exposure comp. by +2 or - 2 stops in 1/3 stop steps.
How do you set file size and compression?
Auto: Func. Set Use down arrow twice to select the compression level on the menu on the left side of the display. You have three options Superfine, Fine and Normal. Superfine being the best quality least compression. Use Func. Set Use down arrow 3 times to select the file size. Use right and left to select L, M1, M2, M3, S, Postcard and Widescreen. L is 3264 x 2448 pixels and about 8 Meg is size While S is about .3 Meg.
Manual: Func. Set Use down arrow 6 times to select the compression level. Other then that is is the same as Auto mode. Use Func. Set Use down arrow 7 times to select the file size. It is the same as Auto mode at this point.
How do you set the exposure meter mode?
Auto & Manual: None
How do you set macro focusing?
Auto & Manual: Use the down arrow repeatedly until you select Macro.
How do you set the flash mode?
Auto: Use the up arrow. The options are Auto and Off.
Manual: Use the up arrow. The options are On and Off.
Ivan Figures Out Sunny 16 For Digital Cameras.
Sunny 16 for digital cameras.
The rule states that on a sunny day you can use f16 for your aperture setting and the inverse of the ISO setting for your shutter speed.
for ISO 400 that would be 1/400 or 1/500 since that is as close as you can get with standard stops. It depends on your camera. This is an eyeball approximation after all.
The proper Full Aperture F Stops are f1.4 f2.0 f2.8 f4 f5.6 f8 f11 f16 f22
The proper Full Shutter Speeds are 8 sec 4 sec 2 sec 1 sec 1/2 1/4 1/8 1/15 1/30 1/60 1/125 1/250 1/500 1/1000
What if your digital camera does not do f16?
So for a digital camera if the best you can do is two stops down from f16 which would be f8. Then you should move your shutter speed two stops up to compensate.
My Canon A720 IS does f2.8 f3.2 f3.5 f4 f4.5 f5 f5.6 f6.3 f7.1 f8
These increment in 1/3 stops for a total of three actual full sized stops.
My Shutter Speeds are 15 13 10 8 6 5 4 3.2 2.5 2 1.6 1.3 1 .8 .6 .5 .4 .3 1/4 1/5 1/6 1/8 1/10 1/13 1/15 1/20 1/25 1/30 1/40 1/50 1/60 1/80 1/100 1/125 1/160 1/200 1/250 1/320 1/400 1/500 1/640 1/800 1/1000 1/1250 1/1500 1/1600 1/2000.
These also increment in 1/3 stops.
You should use the proper F Stops to calculate the sunny 16 rule for your max apature. In my case f8. And since I am using ISO 400 the sunny 16 rule would set my shutter speed at 1/400. My camera does do 1/400 so now I just have to count up two full stops on my shutter speed list. That would get me to 1/1500. And that should fit the sunny 16 for my camera. If it's not quite right I can fudge a little.
My test picture came out pretty good. It looks good though as you can see. It wasn't bright and sunny all over but I had good sunlight behind me.

Another picture 1/3 of a stop back on shutter speed (1/1250) looks noticeably brighter though.

So as a rule of thumb you can use the following formula for for f8 on a sunny day. Shutter speed = 1/(4 x ISO). It will get you close to what you need if not right on.
The rest of the Sunny 16 rule.
If it is slightly overcast, shadows are soft around the edges. Back off 1 f stop. ie. f8 to f5.6
if it is really overcast, shadows are barely visible. Back off 2 f stops. ie. f8 to f4
If is heavy overcast, no shadows at all. Back off 3 f stops and punt. ie. f8 to f2.8
Couldn't test the other two. Maybe Later. I hope this is useful to someone. I am a rank amateur and this little report is my way of smart making.
IrfanView - Official Homepage - one of the most popular viewers worldwide
IrfanView - Official Homepage - one of the most popular viewers worldwide
This is an excellent FREE resource for working with digital images.
This is an excellent FREE resource for working with digital images.
Building Your Blog: 10 things to consider when building your rockin’ photoblog
Building Your Blog: 10 things to consider when building your rockin’ photoblog
These are good recommendations, I do not necessarily follow them, but they are probably accurate!
These are good recommendations, I do not necessarily follow them, but they are probably accurate!
Tuesday, April 22, 2008
Why Share Photos?
I am trying to capture that moment in time, when I take a picture. I want to share my photos mostly with family and friends, and some on the web. These pictures are more general pictures. I like taking pictures of the moon, sunrises, sunsets, and before and after pictures of projects that I am doing, usually mechanic stuff. Here are some other pics I have on Flickr!
.JPG)
.JPG)
.JPG)
Sharing Photographs
The reason I share photographs because I would like to show everyone what I do and what kind of person I am like. I'd take photos of stuff I like and show them, so everyone knows what my personality is like.
http://www.flickr.com/photos/24212021@N03/ - my Flickr account
http://www.flickr.com/photos/24212021@N03/ - my Flickr account
Saturday, April 19, 2008
Microsoft Office Live Free Domain and Web Hosting Deal - Best Price Cheap Sale Items Review Wholesale Sale Discount - Techbargains.com
Microsoft Office Live Free Domain and Web Hosting Deal - Best Price Cheap Sale Items Review Wholesale Sale Discount - Techbargains.com
Here is that link I mentioned in class. I just use it for wanderingphotography.com but it might be worth exploring. The cost is right!
Here is that link I mentioned in class. I just use it for wanderingphotography.com but it might be worth exploring. The cost is right!
Wednesday, April 16, 2008

Assignment six redo.
Redo
Under exposure:

Slow shutter speed:

Bad white balance:

Bad stabilization:

Bad iso sensitivity:

Bad flash effect:

Under exposure:

Slow shutter speed:

Bad white balance:

Bad stabilization:

Bad iso sensitivity:

Bad flash effect:

3 Versions of Dante

The above image is the original of my cat in a box. I took it in RAW format without flash.

Here it is cropped and sharpened and color corrected using levels.

Then I went crazy and used the glowing edges filter just to see what it would look like and here it is. Also cropped.

And this one is Dante using the waterpaper filter. I thought it looked kind of cool. Also, I cropped the photo.
3 interpretations
I used Adobe Photoshop CS3 to edit this photo. This is the original photograph:


The first interpretation is a black and white photograph. I used the different color channels to adjust which colors appeared more black or more white until it looked just right.

In the second interpretation, I edited the photo so that it looked like a sketch. I did this by changing the photo to black and white, inverting it, changing the layer blend mode to Color Dodge and then using the filter Gaussian Blur with a radius of about 5.

In the third interpretation, I edited the photo so that it looked like an inked comic-book like painting. I used the end result of the second interpretation, the sketch, and deleted all of the white in that image. Then I put this layer of just black sketch over the original photograph. I edited the original photo by using the filter Cut Out. With the black sketch outlines on top of the Cut Out photo, I achieved this result.

Tuesday, April 15, 2008
The Boat seen different ways


 Top photo is the original from then they are numberd 1, 2, and 3. I used Picasa2. It was mid afternoon in an overcast Valdez marina.
1. I used the Fill Light option. I find it shows the bank behind the boat better and the relection of the hill in the water sharpens. I also darkend the shadows justa smig.
2. I used the B&W Filter. Using the color spectrum I chose a rose shade of the spectrum. It gave me sharp lines and the blue tarp didn't get lost in the picture.
3. I am a fan of the soft focus. it gives the picture a "dream" feel to it. i used the Size slider and scaled it up to 60% and with the Amount slider scaled it to 90%.
Friday, April 11, 2008
Amazon.com: Digital Photography: The Missing Manual: Chris Grover,Barbara Brundage: Books
Amazon.com: Digital Photography: The Missing Manual: Chris Grover,Barbara Brundage: Books
I am going to add this book for next semesers CIOS 258 course. I looked at it today at Barnes and Noble. It looks like it covers FLICKR, PICASA, and Photoshop Elements.
I am going to add this book for next semesers CIOS 258 course. I looked at it today at Barnes and Noble. It looks like it covers FLICKR, PICASA, and Photoshop Elements.
Wednesday, April 09, 2008
PLEASE RETURN THE FOCUS GUIDES!
The FOCUS GUIDES WERE NOT FOR TAKING! The focus guides are resource for using in class. I have annotated the guides and use them as teaching tools. Please return them. If you come to TVCC put them in my mail box by the reception area or bring them to class next week! I need and use them.
Thanks
Steve
Thanks
Steve
3 Different Photos


1. The original…
2. I used a levels adjustment layer and here is the result! This is the best one out of these 3!!!
3. I was going to adjust the Hue/Saturation, but saw the Colorize option and this is what I got; kind of neat, looks like a older picture!
4. This picture is inverted. I wanted to adjust the Hue/Saturation, but anything I did made it look worse…
Editing and Enhancing photos
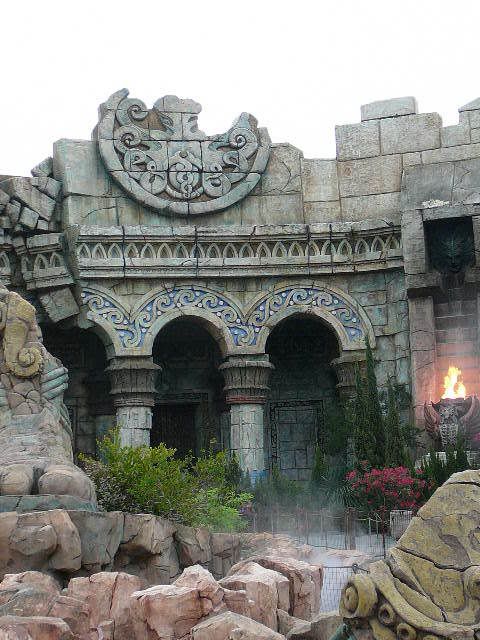
 This photo is much darker than it was outside that day.
  I tried to straighten the photo. However, I was trying to staighten the the poles which made my horizen seem unstraight.
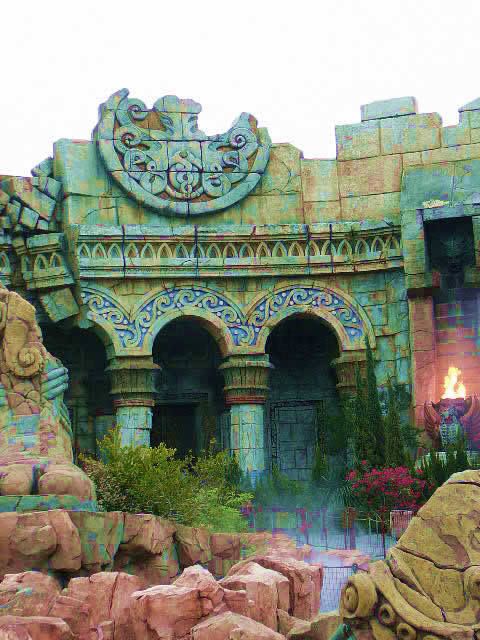
  Here I lighten the picture by changing the highlights. I then changed the color tempature so everything appears blue and not gray.
 I changed the picture to black and white and used a blue and green hue. I prefer the black and white picture out of all of them. I feel that it is more refective of what I invisioned when I took the picture.
Subscribe to:
Posts (Atom)