Wandering In Fairbanks Alaska 2006 Winter and Spring: Stephen Cysewski
Here is part 1 of my semester home work!
Steve
Monday, April 30, 2007
Fairbanks Alaska Summer Solstice and Tanana Valley Fair 2006: Stephen Cysewski
Fairbanks Alaska Summer Solstice and Tanana Valley Fair 2006: Stephen Cysewski
Here is my home work for the semester, part 2.
Steve
Here is my home work for the semester, part 2.
Steve
Friday, April 27, 2007


Cannon Powershot A540 Reviews
According to http://www.trustedreviews.com/digital-cameras/review/2006/05/26/Canon-PowerShot-A540/p2 the cannon powershot A540 is a good camera with acceptable capabilities. It has many different modes depending on the shot you are trying to get, and takes has pretty good video capabilities. However, they do not like the "lack of" manual. They feel as though more needed to be included and that many companies leave out the full manual to save money. You can download the full manual or get it on CD ROM. They feel as though this camera is complicated and you shouldn't have to go through the hassle of searching for the full manual especially since it is obviously much needed. - This was a review for novices.
http://www.imaging-resource.com/PRODS/A540/A540A.HTM says that this cameras is definitely worth the money!. The describe it as one step above the A530. They say that this camera will be very popular in the "Powershot Line". They say this this camera is easy enough for beginners to use, but has all the necessities to please the more advanced photographer. - This was a review for "shutterbugs to professionals".
http://www.digitalcameratracker.com/archives/2006/10/02/canon-powershot-a540-review-and-sample-photos.html has a different review to give regarding the consumer. They say that cannon has not marketed this camera as well as they should have and that people have yet to notice it's potential. They do say, however, that is is a "little gem". They agree with the other reviews that this camera was focused on the beginner with the auto mode, but has all the makings to please the professional with the manual mode. They give the following four reasons why this camera is worth the price:
"1. Great performer in Auto mode - rarely need any post editing. (Beginners can just turn it on a shoot)
2. Its compact size and large LCD display.
3. Uses two AA batteries, making it ideal for traveling overseas without needing proprietary battery chargers, however, it does REALLY well with AA Lithium batteries.
4. SD cards in 1GB-2GB are inexpensive now and you get enough storage to capture an entire vacation’s worth of photos on one card
5. Flash works really well indoors. (A lot of compacts have underpowered flash.)"
The person who tested this camera for this review said that three of their friends purchased one and all love it.
Five Lost Photos
I had to let this assignment sink in for a while before I could remember five photos that I wish I had taken. There was this beautiful tall pine tree that stood directly outside the front door of my House. It was one of the greenest, most beautiful trees I had ever seen; especially when the sun shone on it. It grew so big that we ha to cut it down, and for some reason I decided I had enough pictures of it to take another one. But, now that I look back, and every time I go home and don't see it I wish I had.
Another photo I wish I had taken in my yard is a picture of the garden my dad created. When we first moved in our "yard" and driveway was all dirt. Now there is a beautiful brick walkway, many gardens, and green grass. The whole thing was put together by my family and it holds great memories of wonderful family times. Now, that I live away from home I wish I had pictures of the gardens and yard to remind me of those times.
I cannot think of a specific situation at the moment, but I really don't like those times (kind of like the first situation I described) when in the moment you don't really see a photo worth taking, but when you look back on the situation you wish that you had taken the picture.
This is my first time in Alaska and I want to remember all of the places I travel to. I do regret not stopping the car and taking pictures around town in Fairbanks.
When all of the ice sculptures were out I saw a sculpture on the UAF campus of a family of wolves. I absolutely love wolves and every time I drove or walked by I said I would take the picture next time. But, of course I procrastinated so much that it melted.
Wednesday, April 25, 2007
why do i share photographs
The reason i share photographs is because i like people to see whats going on in my life. Recently since i have been using photoshop, i like to show people what i have done and i want them to see things in a differant perspective.
My audience is anybody who is willing to look at my pictures. I would like it so that my pictures would catch their eye and they would take the time to stop and take a better look at them. The motivation comes from hearing from people about what they think about them. I would like to share anything that i have done and am proud of, i dont see the point in posting pictures if your not done or satisfied with them.
My audience is anybody who is willing to look at my pictures. I would like it so that my pictures would catch their eye and they would take the time to stop and take a better look at them. The motivation comes from hearing from people about what they think about them. I would like to share anything that i have done and am proud of, i dont see the point in posting pictures if your not done or satisfied with them.
where my picturez reside yo!
Ok, here is the link to where I have most of my pictures....not all of them on my flickr page are ones that I have taken, and I haven't been able to organize them yet, but you can look through them, and guess which ones I have taken! I will also put the link to my MySpace page and my blogspot, which are my two main ways to share my photos...
www.flickr.com/photos/daviper07
www.myspace.com/daviper07
www.vypr-lifeofaweirdone.blogspot.com
have fun!
www.flickr.com/photos/daviper07
www.myspace.com/daviper07
www.vypr-lifeofaweirdone.blogspot.com
have fun!
sharing photos to the outside world....
Currently I have started a web blog called "Greener's Adventures" and I will be using Picasa Web Albums to help publish and do a slideshow to create the atmosphere where I have been and what I have seen and done.
I think that this will be a great blog to share with the outside world and hope that I can get some feedback on my pictures...
I think that this will be a great blog to share with the outside world and hope that I can get some feedback on my pictures...
Today's assignment
For my final project I plan on showing my photographs by copying them from my cd to Picasa and using Picasa to do a slide show.
I Really Like These Photos And I Want Others To See Them!
Here is my FLICKR account. I have yet to learn how to create my own blog/website. As for now, I will depend on FLICKR. I've added many more photos to this account since my last URL post. Enjoy! http://www.flickr.com/photos/7148206@N02/
You can also double click the title and it will connect you directly to the URL.
You can also double click the title and it will connect you directly to the URL.
Have a Great Day!
I am working on my brand new web site, offroad4fun.net to present my photos and if that does not work I will use flickr. At the present I am having a very difficult time with trying to incorporate photos, because I want people that visit my web site to be able to post photos also, hopefully by this weekend I will have completed my task. If anybody has any ideas or knows a site or program that I can incorporate with my web site (I have tried a couple, but so far no success), please tell me, thanks.
Tuesday, April 24, 2007
my blogspot
this is my blogspot....as of now I'm currently updating my photos everday so it should be up and running with more photos...http://msuspartygrnwht.blogspot.com/
Sunday, April 22, 2007
Thursday, April 19, 2007
To who and why I share? And what kind of photographer am I (Redone)
Well I mostly like taking pictures just to remember things, and capture a moment (not to sound cheesy or anything), because it's sort of like i have stopped time forever with just a single frame. It also allows me to show people the way I look at things in life. And I like to show, people things that they can see if only they looked at if from a different angle or aspect. I don't really care who I share them with because I am not really trying to impress anyone. So my audience is whoever is really interested, no ones opions really matter to me, if they like the pictures I take, it makes my happy that I may have influenced someone else's life, if not... well....tough they don't need to look at them. No one should ever have to conform their ideas, or methods when it comes to art, or taking pictures. The photography world is full of endless possibilities which is the beautiful thing out it.
Wednesday, April 18, 2007
the Why, Who, and What of sharing
I enjoy sharing my pictures with those who have a similar interest of the subject material. For example, I most enjoy sharing climbing pictures with climbers, scenery photos with outdoor enthusiasts, and artsy shots with artists. I try to only share the quality pictures that I think others would appreciate because I would want others to do the same for me. By sharing my photographs I find that I have a venue or an outlet for my work and in doing so I hope to inspire others to pursue art, or at least help them to appreciate art.
workflow
For my work Flow i went through my pictures and took some pictures and tried to find pictures i could use that had things that could stand out. This first picture i Clicked Edit in quick mask and painted the eyes and the ring. It appears as a transparent red. Then i selected standard mode and it selected the eyes and ring so they wouldn't be effected. Then i desaturated the picture. Then i created a new layer painted over the eyes with green and turned the opacity down to 33


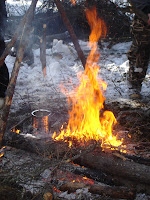
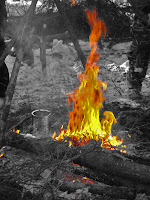
I did the same thing with this next picture, the only difference is i didn't color over anything, i just desaturated everything but the fire.
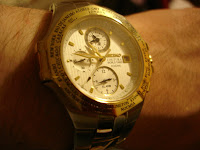
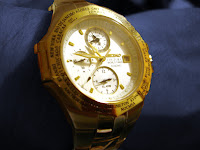
Then this last photo, the first thing that i did was select adjustment layer, then levels and set white point. then i clicked on the middle of the watch. Then i did the same thing as the last pictures. I clicked quick mask mode. painted the watch. then selected standard mode. Desaturated everything but the watch. Then i painted a black layer mask and turned opacity down to 50.


Why do I do what I do?
Well, ok, I share photographs, mostly to see if other people see in them what I do, and to let them get a little sneak peak inside my head. I enjoy sharing my "discoveries" and excitement with other people, so it's great to be able to do that easily and quickly, via the web. I would have to say that my main audience is anybody with a sense of humor... I like to think that I'm a pretty funny guy, so there again, I feel the need to share it! With the advent of taking this and my Photoshop class, my talents as an artist are expanding to the realm of photography, and more specifically, digital photography. I enjoy doing stuff like graphic design, so that is another way I can share what I do. In fact, speaking of graphic design, an opportunity that I have taken, is doing the bi-weekly newsletter for the North Pole McDonald's where I work. Ok, back to the subject at hand...basically, my motivation for sharing photographs, is to see what other people think of them, so that they can laugh with me, and help me on my quest to be a better photographer!
My Work Flows
Find the file in my documents and right click to open with photoshop
Rotate the picture to the desired orientation
Crop the picture to fit the determined composition.
If there is red eye use the red eye tool to make the pupil gray, then the burn tool to darken it to a natural looking color.
Use the sharpen tool if there are any parts of the picture that are unnecessarily blurry
Go to the layer palate and create a levels layer
Convert to Black and White if wanted by adjusting the RGB sliders
Use eyedroppers to get the right color cast
Select portions of the image to either delete or modify to prevent distractions from the photo’s subject.
Adjust contrast under the ‘Enhance’ tab, then ‘Adjust brightness/contrast’
Use the clone stamp or pattern stamp tool to remove imperfections or dust.
Import other files to a blank layer in case of file layering
Apply filters or effects for artistic purposes if desired under the ‘filter’ tab.
Save file to a new name so to keep original in case of other projects.
Print at Sam’s club or post online to flicker account.
Displaying My Photographs
 A key reason why I enjoy displaying my photographs is to share memories with family and friends. Memories captured as photographs conjure up an array of feelings that return former emotions and experiences. Several of my friends live out of state and sharing photos of enjoying or suffering the winter weather allows them to return to that particular moment when they once lived it. They embrace those former feelings and they take pleasure in or bear those moments with me. When I shared a photo of my son and I riding in the snow, my best friend/former Fairbanksan, stated that she could just hear the snow crunching beneath the horses' hooves.
Each photograph taken and shared contains a spirit of a person, place, animal, or object that brings significance to the subject. There are several photographs that I had taken of my dad prior to his passing five years ago; he had undergone an extreme case of lung cancer. Sharing dad's pictures with my family allows us to remember him as he was, brilliant and beautiful.
When photographs are shared, they bring out a special part of us that we are unable to witness without them. Pictures expose our own true character, strength, and beauty. This sense of self separates us from the rest of the world.
Tuesday, April 17, 2007
Work Flow
 This is located downtown Missoula, in November of 2003, the Clark Fork River is located runs through Missoula...
1) I cropped the image
2) Then I straighten the image
3) Pressing the "I'm feeling lucky" button lighten it up
4) Finally I did "Warmly" to add warmth to the picture


1) I cropped the image
2) Then straighten
3) Pressing the "I feel lucky" button
4) Then I added "focal b&w"
5) Added a blur tint to it

Why I share?
I share with friends and family to remember people and places, events, or just cool things. I like to see the joy on their faces when they see a photo for the first time or remember when it was taken. I share just about everything I take and I am camara happy so it is allot of pictures. photos help you to remember things in your life and they will be there for you to see for a long time.


Work Flow
Original Photo (Edited with Picasa2)

I started by Tuning it, Fill Light, Highlights, Shadows, And Color Tempurature.
Next I Sharpened it
Then, I used the Saturation.
Final Photo

2nd. Original Photo

I started by straightening the photo
I Croped it
I used the Tuning, Fill Light, Highlights, Shadows, And Color Tempurature.
I Sharpened it
I used the Saturation.
2nd. Final Photo

Sunday, April 15, 2007
Why I Share Photographs
I share photographs because I want other people to see where I have been, what I have seen and done. I also like to see and hear what kind of reactions my photos bring about other people. My main audience is my family and friends. I like to show them photographs from Alaska so that they can imagine where I am and how it is here. I share all kind of photographs I have taken. I especially like scenery photographs and photographs from different places I have been.
My Workflow
I like this picture, it was taken in Los Angeles, but some parts are under exposed.

Here is my workflow with few corrections:
1. Make a copy of the background
2. From New Adjustment Layer I choose Levels with default settings
3. Channel RGB, Input Levels 0, 1,47, 182 and Output Levels 0, 255
4. Black brush with smooth edges, size 170 px, mode normal and opacity low (10%)
Here is the result.
This second picture was taken in San Francisco and it has the same problem, it is under exposed. I used the same workflow with some modifications.

1. Make a copy of the background
2. From New Adjustment Layer I choose Levels with default settings
3. Channel RGB, Input Levels 0, 1,66, 232 and Output Levels 0, 255
4. Black brush with smooth edges, size 170 px, mode normal, opacity low (10%)
5. Cropped the picture
6. Healing brush, Diameter 17x, mode replace
And here is the result.
I like this workflow, because I can use this with both under and over exposed photographs. If the photograph is over exposed I just need to adjust the levels other way round.

Here is my workflow with few corrections:
1. Make a copy of the background
2. From New Adjustment Layer I choose Levels with default settings
3. Channel RGB, Input Levels 0, 1,47, 182 and Output Levels 0, 255
4. Black brush with smooth edges, size 170 px, mode normal and opacity low (10%)
Here is the result.

This second picture was taken in San Francisco and it has the same problem, it is under exposed. I used the same workflow with some modifications.

1. Make a copy of the background
2. From New Adjustment Layer I choose Levels with default settings
3. Channel RGB, Input Levels 0, 1,66, 232 and Output Levels 0, 255
4. Black brush with smooth edges, size 170 px, mode normal, opacity low (10%)
5. Cropped the picture
6. Healing brush, Diameter 17x, mode replace
And here is the result.

I like this workflow, because I can use this with both under and over exposed photographs. If the photograph is over exposed I just need to adjust the levels other way round.
Baby on Board, and a Photography Business, Too - New York Times
Baby on Board, and a Photography Business, Too - New York Times
I thought this might be interesting.
Steve
I thought this might be interesting.
Steve
Week 9 Assignment
I used Picasa to enhance these photographs. This first one I used the Fill Light tool under View and Edit picture. Originally it was very dark and you couldn't make out the details of the cabin.

This is how the photograph looked originally. It's so dark you can't see details. I only cropped it.

In this copy I used Tuning Adjustments: fill light, highlights, and color temps for more color.

Friday, April 13, 2007
WorkFlow for Editing Pictures
The first set...
"Thee orginal"
“Final version”
1.) Choose a picture
2.) Look @ picture and decide what I want to do with it
3.) Go into my program (Elements 4.0)
4.) Make a duplicate background or layer
5.) The program automatically makes a layer when I chose these;
- “Levels” (I adjusted with the white and black dropper)
- “Hue/saturation/lightness” (both pics needed almost exactly the same adjustments); Hue +3/Saturation 0/ Lightness +6
6.) Cropped
7.) Look at picture again and see if I need to change anything special in it
8.) In both pictures I wanted something out of them:
- Took the “Rectangular Marquee Tool” to make a box around the object in picture
- I am still learning; first I used the “Healing Brush”, settings of; Replace and 15px
- Next I used the; “Smudge Tool”, settings of; Darken and 24px
Second set!
“Orginal”

“Final”

When I completed these pictures, I had no ideal that they would have had almost the same setting… This is something for me to think about; because I did not take the first picture.
Thursday, April 12, 2007
Iona's Workflow Plan

Original photo

Redo of photo
My workflow plan is rather simple at this time. As I become more proficient I hope to be able to use Elements 5 to greater advantage. I am developing a notebook for task bar steps that I have used in removing objects, etc. that I know will be useful because if I don’t use a process several times and even if I let it go a few days, I forget how to do even the basics.
Of course I did not take the first picture since it is of me but I wanted to see if I could straighten it and bring out the colors a bit . I want to use it on a site about my trail trip.
1. Image->Rotate canvas->90 degrees
2. Crop and straighten
3. Enhance (Perhaps try Auto Smart Fix here)
a. Maybe use Auto Sharpen depending upon the picture content
b. Adjust lighting
1) Shadows/Highlighting
2) Levels
a) Input levels 23, 1.00, 255
b) Output levels 24, 233
c. Adjust colors
1) Adjust Hue/Saturation
a) Hue 0, Saturation +17, Lightness 0
2) Adjust Color Variations
3) Adjust Color Curves
a) Advanced Options
3. Filter (if there is noise) That is the only option I have tried in the filter section.

Original photo

Redo of photo
1.. Crop and straighten
2.. Enhance (Perhaps try Auto Smart Fix here)
a. Maybe use Auto Sharpen depending upon the picture content
b. Adjust lighting
1) Shadows/Highlighting
2) Levels
a) Input levels 20, 1.00 215
b) Output levels 0, 200
c. Adjust colors
1) Adjust Hue/Saturation
a) Hue +6, Saturation +29, Lightness -12
2) Adjust Color Variations
3) Adjust Color Curves
a) Advanced Options
3. (In this second picture I cropped it some, made the adjustments and then croppeded the
picture because as I worked with the it I didn't like the light on the left.)
4. I have a folder where I put some pictures that I share with friends on DVDs. Some I
put on a CD and have printed at Sam’s to use as greeting cards.
5. I put each of them in a folder by date so that I can make a day-by-day diary of my
time in Alaska to be able to relive the time after I am not able to be out and about.
My others are stored by trip or occasion. I plan to use my Box.net account as backup
storage and eventually have many available on a blog sites.
Wednesday, April 11, 2007
Sharing Photographs
Why do I share photographs?
I share photographs because I love to share my life with my family and friends who live in the lower 48. It's fun to trade photographs of my children, pets, and flowers that I have tried to grow in the summer. Besides just the fun part of taking the photographs passing them around for others to look at makes it more fun.
Who is my audience?
My audience is my brother (he loves Alaska and wished he could live here but his girlfriend says "no."), my older sister and her daughter, my niece Mandy. Mandy and I share our love of our pets by e-mailing photographs to each other. I intend to start posting my photographs on my blog site. This will be a fun project. There are a couple of friends I e-mail my photographs to as well. I am going to try and print some using photographic paper so I can send them to my mom who is not computer savvy at all.
What do I want to share?
Hmm, let's see now! My cat Siris is a ham when it comes to taking photographs. Then there are my flowers in the summer. When the weather changes and then the plants do too. Driving the Parks Hwy there are sensational views of the sky, valley, even the highway itself. I took photographs one day that it was so windy I almost lost my camera. I took photographs of the snow sweeping across the highway. My land changes all the time. I take down more trees or paint something and this year....the old autos have got to go but not before I take a photograph of them first. I almost forgot, I have taken photographs of the buildings in Nenana where I live close to. Well, closer than Fairbanks. And those moose that travel through my yard, I forgot those....and did I mention.....
Work Flow


The first image is the original. The second is the enhanced and mended. I enlarged the photo first to the size I wanted it to be. I wanted to really see the bird up close and the detail in the feathers as well as the coloring while getting rid of "things" that were distracting.
Making sure the setting was at 100%, I cropped the section of the photo I wanted to save and enlarged it to fit the screen (200%). Using the Eye dropper at the side menu I left clicked on the part of the subject's color I wanted to use for the foreground then went to Image, Adjustments then Auto Color.
In the menu at the top of the page under Layer go to New then give it a simple name like "mend." At the top of the page is a listing that says Select All Layers, check the box.
The menu on the left choose the Lasso tool and draw a line around the section to be changed. This will leave a pulsating broken line. Choose the Clone Stamp tool on the menu at the left then press the Alt key and left click the mouse on the section of the photo that you want to use to cover up. Then holding down the left key on the mouse pad carefully go over the section that you want covered. You can undo and redo if necessary. You can use Paint Brush tool as well but will need to choose the right size brush for the job which is at the top left.
When you are satisfied with your work go to Save As under File and give your new photo a new name and save on your cd or program.


I applied the same steps on this photo and if you could see what I have seen of the color of the wings and the clarity you could see it is well worth more time spent, which I intend to do, using more tools.
Week 12
Week 12: Sharing Photographs: I really like these photographs I want others to see them?
Why do you share photographs?
I share photographs because it is nice to allow others to see times that made me happy, as well as to let them see a glimpse of my friends, and as well as capturing the moment, witch just might look really cool! So I will take a photograph of it.
Who is your audience?
My audience is my friends, family, and a select few others that I might wish to see my photos. This way when I want them to see something I thought was cool, nice, or just capturing the moment; I can call them or email them the link to let the see it.
What do you want to share?
I want to share my photo's of friends, and moments that are captivating or a scene that pleases the eye!
Workflow
Alright, I decided to take a photo I took of a store forklift and turn it into a decal for an ingame image.

First thing I did was rotate the image and crop it.

Next I used auto-levels, contrast and color. I liked how it made the red brighter so I did nothing further to color. I also turn down the contrast -10 and brought up brightness +6. I also used sharpening on the red and white portions.

There! It is now ready as a decal for game use.
Subscribe to:
Posts (Atom)