Wednesday, October 24, 2007

week 6


over exposure


incorrect white balance/wrong color


depth of field /wrong plan of focus


under exposure


motion blur


dark under exposure


PhotoQuotes.com - Quotations from the World of Photography

PhotoQuotes.com - Quotations from the World of Photography
This is very cool! I am sure I will inflict this web log on future classes.

Camera (Mistakes) by, Terri

Depth of Field
Underexposed

Subject Blur

Over Exposed (incorrect white balace)

motion blur

Week 6 Project

1. Subject blur/Partially blurry photograph
2. Motion blur/Totally blurry photograph
3. Depth of field/Wrong plan of focus
4. Over exposure/Washed out
5. Under exposure/Too dark
6. Incorrect WB balance/Wrong color
Common Errors in Photography

I put the pictures all together on a little webpage, here is the link.

Tuesday, October 23, 2007

Wk 6 Error Photographs

Incorrect WB/ wrong color


Motion blur


Wrong Depth of Field/ Focus


Subject Blur


Under Exposure/ darkness


Over Exposure/ Washed Out


Jaime Lowery

Week 6

Subject Blur


Motion Blur


Depth of Field

Over Exposed

Under Exposed

Incorrect White Balance

Sunday, October 21, 2007

Roger M. Marty - CIOS 258 Lesson Week 6


1 - Subject blur / Blurry Photographs

2 - Motion Blur / Totally blurry photographs

3 - Depth of Field / Wrong plan of focus

4 - Over Exposure / Washed out

5 - Under expoure / Too dark

6 - Incorrect White Balance / Wrong color

Thursday, October 18, 2007

Week 6 Project Part 2 - by Kathy Adams

#5 Under Exposure/Too Dark:


#6 Incorrect White Balance/Wrong Color
I set camera for fluorescent but had a regular
light bulb on
Posted by Picasa

Week 6 Project by Kathy Adams

#1 Subject Blur:


#2 Motion Blur:


#3 Depth of Field Wrong:


#4 Over Exposure/Washed Out

Posted by Picasa

JPG Magazine: Stories: Ten Tips: 10 Tips to Travel Photography in a Developing Country

JPG Magazine: Stories: Ten Tips: 10 Tips to Travel Photography in a Developing Country
These tips ring true to me, not just when I travel, but for local "street" photography.

Wednesday, October 17, 2007

Canon Powershot s500 reviews

Strengths:
1.) New print and share buttons of photographs speed and simplify printing and sharing with one-touch image transferring for uploading to the internet, e-mail and image processing programs.
2.) An intelligent orientation sensor detects whether an image has been recorded horizontally or vertically and properly rotates the image for better viewing.
3.)Light-assisted autofocus alos work in the dark with an advanced TTL-AiFi nine-point autofocus system tgat allows the camera to automatically select a primary subject even when the camera is off center.

Weaknesses:
1.) All camera functions are automated limiting the freedom of creativity and discovery of the camera dimensions.
2.) Camera modes are automatically limited in selection of 1-3 modes.
3.) With automated selective modes manually and freely functioning the camera to distort images quality is difficult with the automated intereuption.

reviews @:
www.steves-digicams.com/2004_reviews/s500.html

www.megapixel.net/reviews/canon-s500/s500-gen.php

http://reviews.cnet.com/inkjet-printers/canon-powershot-s500/4505-3156_7-30732126.html

Jaime Lowery

Power Shot s500 Digital IXUS

How Do I adjust the...

ISO?:
Press the FUNC. button, menu and select the ISO/50 and use the horizontal buttons to adjust the speed and hit FUNC. for selection icon to appear on the LCD monitor.

White Balance?:
Press the FUNC. button, menu and select the AWB icon and use the4 horizontal buttons to adjust the white balance and press FUNC. for the selection icon to appear on the LCD monitor.

Exposure Compensation?:
Press the FUNC. button, menu and select the exposure composition icon and use the horizontal selective buttons to adjust the setting in 1/3 stops in a range of -2 to +2 and hit FUNC. for the selection to appear on the LCD monitor.

Size Compression?:
Pres the FUNC. button, menu and select the fine or large icons and use the horizontal buttons to select the desired compression and resolution for the excluding movies and still images and press FUNC. to display the selection on the LCD monitor.

Exposure Meter Mode?:
Press the evaluative button to switch between metering modes automated by the camera. Selection will display on the LCD monitor.

Macro Focusing?:
Press the Macro/Infinity icon button to switch between metering modes automated by the camera which will display on the LCD monitor.

Flash Mode?:
Press the flsh icon button( of the lightning bolt) to switch between on and off modes and desired selection will appear on the LCD monitor.

Jaime Lowery

lesson 4 canon rebal xti how to use it

1. to adjust the iso you click the iso button and select the number you want with the buttons, and they have preffered options for shooting certain things.

2. to adjust the white balence you switch the camera to manual set the mode to P then you hit the menu button go to the camera2 and role down to the wb shift/bkt then select what you want to do.

3. for brighter shots: press “Av (+/-)” button while turning the dial to the right then for the darker shots: press “Av (+/-)” button while turning the dial to the left. reset when your finished.

4. menu/camera 1/quality then pic from small, large or medium and raw large
Large: 3888x2592 pixels Medium: 2816x1880 pixels Small:1936x1288 pixels

5. Set mode dial to the creative zone modes, except for M.a) brighter shots: press “Av (+/-)” button while turning the dial to the right b) darker shots: press “Av (+/-)” button while turning the dial to the left(reset to “0” when done).

6. Set the basic zone to close-up in the pre programed section

7. you can set to no flash mode or you can use the the flash button to take creative pictures

- erk setterberg

lesson 5 cannon rebal xti

http://www.dcviews.com/reviews/Canon-Rebel-XTi-Nikon-D80/Canon-Rebel-Xti-Nikon-D80-review.htm

a few good things about this camera is that polycarbonate body which is m olded around a metal frame. it is made to be held securly in your hand. it is light and easy to carry. this camera is very easy to operate. the xti performs a bit better than the nikon d80 in this review.

http://www.dcviews.com/press/Canon-XTi-400D.htm

the nice thing about these camera's you can buy them with kits they come with image fransfer and viewing, image enhanvement and editing, RGB image editing functions etc...

http://www.outbackphoto.com/reviews/equipment/canon_400D/Canon_400D_review.html

this is talking about the "dust delete data" and dust shake off features. You can do this automatically or manually.

pros
the automatic feature on this camera is expectionally well and there are also a whole lot of manual settings so you can take those unique photos.
there are lots of options for differing lenses.
it has a 2.5" LCD screen which is also a very nice feature.

cons
there are certain feature that don't comply with certain programs like the dust delete data had falled when trying to use with DDP.
it will take a really long time get good at using this camera with perfection.
the lenses are expensive and they say that they cannot stress enough how important it is to have them

Panasonic Lumix (DMC-LX1PP)

Pros:
1. Frame Aspect Ratio Setting. This is by far my favorite setting. You can choose 16:9 widescreen, 4:3 standard monitor, or 3:2 for those standard photo size prints. My favorite is the 16:9 just because I have never had the chance to frame SO MUCH in my pictures before. You have more room to work with, especially in close quarters.

2. JPEG, TIFF, RAW. Once again, this camera gives you more options. Using Raw mode even creates a JPEG in addition to the RAW.

3. Image Stabilization. Adjusts lens to counter your movements, letting you take pictures at low shutter speeds and at high zoom.

Cons:
1. Focal Range reduced when not in native 16:9 aspect ratio. (16:9 28-112, 3:2 33-132, 4:3 37.5-150)
2. Lens is not threaded so you can't change lenses.
3. Sensitive to noise. I haven't noticed much, but all the reviews mentioned it.

http://www.dcresource.com/reviews/panasonic/dmc_lx1-review/index.shtml
http://www.megapixel.net/reviews/panasonic-lx1/lx1-gen.php
http://www.steves-digicams.com/2005_reviews/lx1.html

Week 5, My camera

My camera, the Kodak Easy Share C643, is fairly compact and 6.1 mega pixels with a ton of modes. It has a 2.4 in LCD screen along with a traditional viewfinder, and a 3x optical zoom.

Pros:
Relatively cheep
Compact
Lots of auto setting modes

Cons:
Feels cheeply made
Designed for beginners, making it hard for experienced users to customize settings
Poor overall image quality

http://reviews.cnet.com/digital-cameras/kodak-easyshare-c643/4505-6501_7-31738505.html

http://www.digitalcamerainfo.com/content/Kodak-EasyShare-C643-First-Impressions-Review-/Overall-Impressions.htm

http://www.bdigitalcameras.com/kodak/kodak-easyshare-c643-review/

Week 5

My camera is a Sony Cybershot DSC-T10. It is super compact, and featuring 7.2 megapixel, higher sensitivity and double anti-blur technology, which combines Super SteadyShot with extremely high sensitivity to make blurred images a thing of the past. The large high resolution 2.5" LCD is perfect for sharing images.

Pros:
-Anti-Blue protection makes it almost impossible for you to take a blurry photograph.
-The slide down lense makes it easy to take pictures quickly.
-2.5 inch LCD screen makes it easy to view your pictures, and the built in slide show feature is really handy.

Cons:
-Battery life can be kind of short.
-High-ISO shots are very noisy, particularly under limited-light conditions.
-Limited flash range

http://www.trustedreviews.com/digital-cameras/review/2006/10/26/Sony-Cyber-shot-DSC-T10/p2

http://www.steves-digicams.com/2006_reviews/t10.html

http://www.imaging-resource.com/PRODS/T10/T10A.HTM

Tuesday, October 16, 2007

Week 5

HOW DO I USE A CAMERA TO CAPTURE WHAT I SEE?
Kodak Easy Share Z740
Read the manual & set camera
Place the battery & SD card, in the camera
Start pressing the buttons , learn what the icons mean.
Go to menu to know what set you want to use.

Dcviews:
www.pcworld.com

www.absolut-photo.com

www.cnet.com

summary:
pros: has 10x optical zoom lens handy to use

cons: no image stabilization

Week 5: Camera reviews

The Kodak EasyShare P850 has an amazing array of features, but mediocre photo quality mitigates its appeal.


DCRP Review

http://www.dcresource.com/reviews/kodak/p850-review/

CNET Review

http://reviews.cnet.com/digital-cameras/kodak-easyshare-p850/4505-6501_7-31470099.html

Imaging Resource

http://www.imaging-resource.com/PRODS/P850/P850A.HTM

Pros: Very good photo quality, excellent movie mode (zoom lens can be used), and a wide range of exposure options.

Cons: The lens takes a noticeable time to refocus whenever the zoom position is changed, below average battery life, and poor low light focusing.

Roger M Marty CIOS 258 Lesson 5

I currently use a Nikon D200 a camera that is descibed as the latest in cutting edge technology. A 10.2 megapixel SLR camera that can use not only the latest lenses but almost all of the Nikon line. It has an 11 point metering system, a magnesium alloy body and is dust and moisture resistant. Can shoot 5 frames per second and I have been able to use up to 16GB memory card allowing me to shoot in RAW mode and still take in excess of 900 photos.

Digital Camera Labs:
http://www.cameralabs.com/reviews/NikonD200/
Imaging Resource
http://www.imaging-resource.com/PRODS/D200/D200A.HTM
NatruePhotoGraf
http://www.naturfotograf.com/D200_rev00.html#top_page

Pros:
1. Tough, dust and moisture resistant magnesium body.
2. Large range of custom settings.
3. Fast 5 FPS shooting.

Cons:
1. No TIFF file format
2. Auto white balance does not handle incandescent lighting well.
3. A fairly large, heavy camera.

Canon XTi Rebel Reviews by Marilyn.

To view the reviews for the Canon XTi camera click the urls below:
http://www.dcviews.com/press/Canon-XTi-400D.htm
http://www.steves-digicams.com/2006_reviews/rebelxti.html
http://www.popphoto.com/cameras/3382/camera-test-canon-eos-digital-rebel-xti.html

Features:
"Compact (5 x 3.7 x 2.6") and lightweight, less than two pounds
Canon EF lens mount, compatible with over 50 Canon EF and EF-S lenses
10.1-megapixel (effective) CMOS image sensor, RGB primary filter
Three JPEG resolutions: Large, 10.1 megapixels; Medium, 5.3 megapixels; Small, 2.5 megapixels, Canon .cr2 RAW, or JPEG+RAW file formats ..."
plus a whole lot more... click on the reviews for a comprehensive list.

3 Advantages:
1. Top notch AF: 9 points.
2. CMOS Sensitivity: 10.1 megapixels.
3. 2.5 LCD: larger fonts & icons for easier viewing.

3 Disadvantages:
1. Rear quick control dial replaced by "press & hold" button for adjustments.
2. Flash exposure regulated to a menu.
3. occasional dust particules that show up in picture have to be subtracted by "apply dust delete" option.

Monday, October 15, 2007

Reviews Canon powershot SD600 Digital

Some URL (links)
Reviews on my digital camera; Canon PowerShot SD600 Digital Elph. 6mp

http://www.steves-digicams.com/2006_reviews/sd600.html

http://www.imaging-resource.com/PRODS/SD600/SD600A.HTM

http://www.dcviews.com/press/Canon-SD600-SD630.htm

Some (Pro's)
Big screen appealThe Digital IXUS 60's 2.5" LCD screen allows for sharp composition and reviewing with no squinting or eyestrain. The screen's wide angle of view makes it easier to share playback with a group. The speaker and mode switch have been repositioned on this model for a firmer grip, while the base of the mode switch acts as a thumb rest for added comfort.
A huge wide-angle 3.0" LCD screen – the largest to ever grace a Canon compact digital still camera – is just one of several landmark innovations on the Digital IXUS 65. A new Touch Control Dial replaces the mode dial - touching the dial displays a mode icon on the LCD for quick and easy function selection, particularly after dark. The dial can also be used to scroll through images during playback. A new Image Inspection Tool makes use of the large LCD screen by simultaneously displaying a newly shot image and a magnified section of the image – ideal for checking details before leaving the scene. The magnified spot can be moved between AF points or to any point on the image.

Five Movie modes with sound (up to 640 x 480 pixels, at up to 30 frames per second with a 60-fps Fast Frame Rate mode)
Continuous Shooting mode

Good low-light performer

(I like the fact that it's small, convienent, affordable and i think it takes exceptional pictures- especially if your on the 'go')


some {Con's}
Shutter response at telephoto focal lengths is a little slow
Contrast is a little high, tends to lose highlight and shadow detail under harsh lighting
Battery life is rather short when using the LCD (and you'll need to use it, because the optical viewfinder is so tight)

Difficult to quickly access special scene modes


Sunday, October 14, 2007

Lesson 5 How Do I Use A Camera To Capture What I See?

The reviews I found:

http://www.imaging-resource.com/PRODS/S3IS/S3ISA.HTM

http://www.luminous-landscape.com/reviews/cameras/canon-s3-review.shtml

http://www.dcresource.com/reviews/canon/powershot_s3-review/index.shtml


I have found that my camera has a lot of strengths. You can get different lenses for it and other extras, and it’s not an SLR camera. I have a Canon PowerShot S3 IS.

Here are some strengths:

1.) 12x zoom with image stabilization

2.) Fast startup/shutdown

3.) Wide range of shutter speed

Here are some weaknesses:

1.) No Raw file support

2.) Fast shutter speeds not available at all apertures

3.) Noise at high ISO

Interior Alaska Photographers Club

Our new site is up and running. It's so cool and getting better and better each day, thanks to Lara and Joe! Check it out! -Kathy Adams-

http://interioralaskaphotographyclub.org/index.php?option=com_frontpage&Itemid=1

Saving our history through photographs

Stumbled across this on the web - thought it very interesting.

Nikon Forum: dust on the sensor - photo.net

Nikon Forum: dust on the sensor - photo.net
Here is a discussion on photo.net about sensor dust. Querying photo.net will often lead to valuable links and information. Subscribing to relevant links will send you updates whenever there is a new post to the thread.

Cleaning sensors by Thom Hogan

Cleaning sensors by Thom Hogan
Here is a good article on diagnosing and cleaning your sensor on a digital SLR.

Saturday, October 13, 2007

Lesson 5 Project by Kathy Adams

The three review sites that I visited were:

CNET: http://overture-cnet.com.com/digital-cameras/sony-alpha-dslr-a100/4505-6501_7-31885537.html?tag=prod.txt.7#more

DP REVIEWS: http://www.dpreview.com/reviews/sonydslra100/

And my favorite: DCRP: http://www.dcresource.com/reviews/sony/dslr_a100-review

I found out that I have the very best camera on the market. :) The Sony A100 has many more strengths than it has weaknesses according to the reviews that I have read and from personal experience.

Just three of its many strengths:

1) Super Steady Shot built right into the camera w/special coating on the sensor (Indium Tin Oxide). Since the steady shot is in the camera body instead of the lens, almost any lens used with it will benefit from this feature.

2) The Sony A100 uses Konica Minolta's old Maxxum dSLRs, most Maxxum AF lenses and third-party AF-mount lenses

3) The Konica Minolta 7D and 5D both featured 14 segment honeycomb pattern metering sensors, the A100 advances this with its 40 segment sensor.

Some weakness are:

1) ISO tops out at ISO 1,600 and is sometimes “noisy” at this setting

2) Eye start auto-focus drains the battery more quickly

3) The AF system's main drawback is that it is rated to work only down to plus 1EV, which means that it may fail in extremely dark situations.

Wednesday, October 10, 2007

Fairbanks Photographers Link

This is the link for the Yahoo Group: Fairbanks Photographers. Anyone can join - it's free and we are in the process of starting up a webpage for our group. Check it out and see if you might be interested in joining. http://tech.groups.yahoo.com/group/FairbanksPhotogs/

Lesson Outline Week 4

CANON POWERSHOT SD600 DIGITAL ELPH

You adjust the ISO by selecting (ISO/AUTO) sets the optimal ISO speed, according to the light level when shooting. Pressing the ISO button and switch settings. Cycle through the different speeds with each press of the ISO button.
You adjust the white balance going to “FUNC” Menu, [AWB] * Auto. Use the arrows to chose.
You set exposure compensation by going to “FUNC” , Menu, +- 0 *Exposure compensation. Use the arrows to adjust and chose settings.
To set file size and compression, you go to FUNC. Menu/ L *superfine/ normal/ fine* using the arrow buttons to chose.
To set the exposure meter mode, you go to FUNC. Menu/ Evaluative. Using the arrows to select the functioning meter mode setting.
Setting macro focusing, you press the “Macro” button with is on the camera button selection. Shaped like a tulip flower, it’s right on back of the camera, the flash mode is also an option button located on the camera. It looks like a squiggly upside down arrow. Pressing that, will give you different flash options.

Terri C.

HOW DOES THE CAMERA WORK?

HOW DO YU ADJUST THE ISO?
set the dial by turning to the icon that sayS PASM.
P-PROGRAM
A-APERTURE
S-SHUTTER
M-MANUAL
SELECTION OF ISO:
ISO 80 , ISO 100, ISO 200, ISO 400,ISO AUTO

HOW DO YU ADJUST COLOR?
go to menu: selection :
AUTO-(DEFOAUT)
DAYLIGHT
TUNGSTEN
FLOURESCENT
OPEN SHUTTER

HOW DO YOU SET THE EXPOSURE COMPENSATION?
below the ISO
ARE NUmBERS TO CHOOSE TO COMPENSATE THE EXPOSURE
f12.8, 1/125 -2.0

HOW DO YOU SET THE FILE SIZE & COMPRESSION?
go to menu again
SELECT 5.OMP PRESS & SCREEN SHOWS
4.4MP, 4.0MP, 3.1MP, 1.8MP


HOW DO YOU SET THE EXPOSURE METER MODE?
slection :
multi-pattern, center-weight , center-spot

HOW DO YOU SET MACRO FOCUSING?
go to scn
chose close-upuse for subjuect closer than 28 inches(70cm)
f/2.8-f/3.7,macro focus, center weight metering, center-zone focus,iso 100

HOW DO YOU SET THE FLASH MODE?
using the flash go to auto falsj icon when lighting conditons require.

MY CAMERA IS KODAK EASYSHARE Z740

Nikon Coolpix 3700

How do you adjust the ISO?
I don't think you can actually adjust the ISO manually. There is a feature where it will automatically adjust it if lighting is poor. The camera lets you know when it is doing it by showing a little ISO icon.

How do you adjust white balance?
Aside from choosing different types of scenes in "Scene Mode", in Manual or Auto mode, you can find the option under the main menu. Then you can choose the type of lighting conditions or set it to either automatically adjust it for you, or you can even use a gray reference object to help the camera in weird lighting situations.

How do you set exposure compensation?
You can adjust this any time by pushing the joystick to the right. This brings up a little scrollable option that lets you choose a range between -2 EV (underexposure) and +2 EV (overexposure), zero being the normal.

How do you set file size and compression?
Under the main menu, you can choose "Image Mode" and then you can select the file resolution and you get somewhat of a choice on compression. There is a 2048 Normal and a 2048 High option, the latter having a compression ratio of 1:4 instead of 1:8, or half the compression of all the other image modes. I would probably just leave it on this option, because I like to get as much data to work with as possible. Once you have the picture, you can't just increase the resolution or remove some of the compression artifacting, so I would rather not end up with my favorite photo being stuck at 640x480.

How do you set the exposure meter mode?
I believe the only way is to choose a Scene mode. The camera will adjust exposure automatically in Manual or Automatic mode, but you can use the exposure compensation to adjust it up or down slightly.

How do you set macro focusing?
You push the joystick down and choose "ON" from the scrollable menu. This lets the camera focus on things up to 4cm close.

How do you set the flash mode?
Push the joystick up and choose an option from the scrollable menu that comes up. You can basically choose On, Off, or Auto and then there are two special modes, one for red eye reduction, where it flashes a red eye reduction light preemptive to the main flash, and a slow sync mode where it automatically flashes over a long shutter speed.

The Online Photographer: How to Succeed as a Photographer

The Online Photographer: How to Succeed as a Photographer
Finding your own uniques photographic vision, or style. is closely related in finding out who you are and what you value. If you have an RSS reader I recommend that you subscribe to The Online Photographer. http://theonlinephotographer.typepad.com/

Tuesday, October 09, 2007

Taking Photographs: How does my camera work?

I have a Kodak EasyShare P850 digital camera.

I adjust the ISO by moving the command dial located on the back right of the camera. I roll the command dial until I can see the down arrow above ISO. Then I push the set button and use the command dial to select the ISO.

I adjust the white balance through the menu button. The options are: auto, daylight, Cloudy, open shade, sunset, tungsten, fluorescent, wb1, wb2, and wb3.

I adjust the exposure compensation by moving the command dial located on the back right of the camera. I roll the command dial until I see (through the LCD screen) the down arrow is above exposure compensation. Then I push the set button and use the command dial to select the exposure compensation.

I set the file size and compression by pressing the menu button located on the back of the camera. I use the toggle button to maneuver to the menu that has picture type and file type. I can change the picture size to 5.0 MP, 4.5 MP, 3.1MP, 2.1MP, or 1.2MP. I can change the file type to basic, standard, fine, TIFF, or RAW.

I set the exposure meter mode by pressing the button (square box with eye) on the top right of the camera. The options are: multi-pattern, center-weighted, center-spot, and selectable zone.

I set macro focusing by pressing on the focus button located on the top left of the camera. I use the toggle button to select the option I want; close-up, landscape, and manual.

I set the flash mode by pressing the lightning bolt on the top left of the camera. The options are: auto flash, red-eye reduction, fill, slow, and off.

Monday, October 08, 2007

Canon Rebel XTi Functions (Marilyn)

How do you adjust the ISO?
a). For creative zones only (P, Av, Tv, M, or A-DEP)
select:
100/200 for sunny days
400/800 overcast skies or evenings
1600 for night or dark indoors

How do you adjust the color balance (for printing)?
Using Photoshop CS2 program:
a). download the picture
b). Click “Image”
c). go to “adjustments”
d). go to “color balance”
e). adjust “color levels” for color & tone.

How do you adjust for White Balance ?
1. Setting WB:
Press “WB” button and select the white balance by pressing arrow keys;
2. Custom WB:
a). take a picture of a white object, focus manually and set for correct
exposure.
b). menu/tab2/WB, press set (screen pops up); import previous white picture
taken and press set, menu reappears; select WB button, press right/left arrows
to select balance.
3. Correcting WB:
Menu/2nd tab/WB, press set. Press the up/down arrow to mark/shift position to
desired balance; reset to zero by placing the mark in the center.

How do you set exposure compensation?
Set mode dial to the creative zone modes, except for M.
a) brighter shots: press “Av (+/-)” button while turning the dial to the right
b) darker shots: press “Av (+/-)” button while turning the dial to the left
(reset to “0” when done).

How do you set file size and compression?
Camera menu/1st tab/quality: large, medium, and small; plus either fine or normal.
Large: 3888x2592 pixels
Medium: 2816x1880 pixels
Small:1936x1288 pixels


How do you set macro focusing?
a). Set the basic zone to close-up (pre-programmed settings).
b). aim and shoot.
c). with minimum focus distant limitations: 0.28m/0.9ft with lens of 15 to 55mm.
d). can improve the distance using macro lens and or telephoto lens depending on
effects sought.

How do you set the flash mode?
1. For creative mode pictures, press the “flash” lightening button located on the upper
left to take pictures
2. Set the basic mode to “Flash Off” when taking pictures for various effects:
Candlelight.
3. Flash Exposure (FE) lock:
Press the “flash” button
Focus on the subject
Press the “*” button to lock the exposure flash
Take the picture.
4. See also problem # 3 for exposure compensation.

My favorite Photographer

My photographer of choice would have to be Yiannis Samaras. The reason I picked this particular photographer is probably because I was able to work with him as a cinematographer on the production of CHRONICTOWN that filmed here in Fairbanks during February and March of this year. I had the wonderful opportunity to not only work with a film production company, but also with a very talented cinematographer, and well respected photographer. His particular style interests me because of his combination of realism and fantasy, and the ability to portray massive amounts of emotion in a photo without words or movement.

Yiannis has also designed lighting for top fashion shows and night clubs in Europe.

Here is his personal website:

http://www.yiannissamaras.com/

I picked #42 in his portraits section because it is a beautiful photo...absolutely stunning.

Pictures I wish I had taken

These are just a few of the pictures I wasn't able to capture:

1) 4 years ago my family vacationed in Orlando, Florida. We were staying at the Shades of Green Resort just off of Disney property. I woke up early one morning and was able to witness one of the most beautiful sunrises I have ever seen....the kind that in a photo seem impossible and photoshoped. However, I didn't even have a camera at the time, so I was unable to capture it.

2) A friend of mines' little boy timothy. My family took him out on a berry picking extravaganza one afternoon in august, up on Murphy Dome. When we jumped out of the car he ran up to the top of the hill and stood there waving his arms at the valley below, but of course my camera had ran out of batteries...

3)Chilkoot Trail: a hazy morning standing on the top of the golden stairs, watching the fog lift from the valley. I DID take this pic, however my camera wasn't nearly good enough to capture the image for what it truly was.

4)Chilkoot Trail: Camp Bennett, when I found out Cameron Diaz was on the trail right in front of us and had written in the camp journal.....and of course the picture didn't come out! you couldn't read it!

5)Washington D.C: during my internship with Senator Stevens I of course never had my camera with me when we were accompanying the Senator.....I do have some professional shots with the Senator, but nothing that I took.

Saturday, October 06, 2007

Lesson 4 Project by Kathy Adams

How do you adjust the ISO?

On the Sony A100 to adjust the ISO you have to turn the function dial (top left of camera) to the “ISO” option and then push in the little button in the center of this dial. When you do this the LCD screen will show all the ISO choices you can choose from: Auto, 100, 200, 400, 800 and 1600. Also, there is a Lo80 and a Hi200 option.

After you see the menu appear on the LCD screen you have to use the arrows on the “controller” button to pick the ISO setting that you need. I really don’t know what the Lo80 and Hi200 are for from reading the manual. I’ll have to research that further.

How do you adjust white balance?

To adjust the white balance you need to turn the function dial to “WB” and push in the button in the center of this dial. It will then show you your WB options on the LCD screen which include: AWB (auto white balance); daylight (outdoors, sunlit subjects); shade (for shady conditions on a clear day); cloudy; tungsten (where lighting conditions change quickly, such as at a party hall, or under bright lighting, such as photography studios); fluorescent lighting; flash; 5500 K (color temperature) and a recall option where you can set up a custom white balance setting which will be retained until you make a new setting. You have to use the up and down arrows on the controller button to choose the option you desire.

How do you set exposure compensation?

“You can manually shift the exposure value determined by the camera. Use this mode when you do not get the proper exposure, for instance, the subject and its background have high contrast (light and dark).”

Press the +/- (Exposure) button on the back which is just right of the eyepiece; as you hold the Exposure button in, turn the control dial to adjust the exposure. (The control dial is on the top, right hand side of the camera right in front of the shutter button.) + brightens the image; 0 the exposure is determined automatically by the camera and – darkens the image. The compensation level is displayed in the EV scale on the LCD monitor and in the viewfinder.

How do you set file size and compression?

To change the file size you will need to turn on the camera and push the “menu button” on the back of the camera. This will bring up a screen that shows: Recording menu 1 & 2 and some others items. In Recording Menu 1 you will see “Image size” as your first option. Push the down arrow on the control button and then push the right button. You can now choose between L (3872 x 2592 pixels), M (2896 x 1936 pixels) or S (1920 x 1280 pixels).

To change the compression you will use the same Recording Menu (1) and under the option of “Image size” you will see the option of “Quality" and this is where you can choose “RAW”, “RAW & JPEG”, “Fine” and “Standard”.

How do you set the exposure meter mode?

To set the exposure metering mode you will need to use the function dial and button again. When you turn the dial to the exposure icon and push the button the display will come up on the LCD screen. You will have these options to choose from: “multisegment”,center weighted” and “spot”. You will have to use the controller button arrows to pick which mode you want and then press the center button on the controller to set the mode.

How do you set macro focusing?

I am not sure what answer you are looking for here. I looked all through my manual and all I have regarding “macro” is on the mode dial which is on the top of the cameral near the middle. It shows the word Macro and has an icon of a flower. The manual says: “Shoots close subjects such as flowers, insects.” I know a person can do this with the manual settings also, not just the scene mode dial.

How do you set the flash mode?

To set the flash mode you will use the function dial and button again. Turn the function dial to the flash icon and then push the center button of the function button. This gives you the options of “auto” (autoflash), “fill-flash”, “Rear sync.”, “Wireless” and you can also change the flash compensation in this window also.

You can also set the amount of flash light you want also but it is done differently. You use Recording Menu 2 to do this.

Friday, October 05, 2007

How My Camera Works

How do you adjust the ISO?

Adjust the shooting mode dial to a shooting mode that allows for ISO change. Push the ISO button to the desired ISO setting.

How do you adjust color balance?

Adjust the shooting mode dial to a shooting mode (Manual Mode) that allows for color change. Then you push the function button and select color mode icon form the menu. Then from the next menu select the custom color setting.

How do you set exposure compensation?

Adjust the shooting mode dial to a shooting mode (Program Mode) that allows for exposure compensation. Push the function button and select the exposure icon from the menu. Then use the left and right arrows to select the exposure.

How do you set file size and compression?

Adjust the shooting mode dial to a shooting mode that allows for file size and compression. Then push the function button and select the pixel size from the menu. Then use the left and right arrow keys to select the file size you want. The push the set button to go to the compression settings. Then use the left and right arrow keys to select the compression you want then push the function button again to exit the menu.

How do you set the exposure meter mode?

Adjust the shooting mode dial to a shooting mode that allows for exposure meter mode. Then push the function button and go to the setting that allows you change the exposure. Use the left and right arrow keys to select the one you want. Then push the function button again to exit the menu.

How do you set macro focusing?

Adjust the shooting mode dial to a shooting mode (Program Mode) that allows for macro focusing. Then push the macro button to put it into macro and for really close shots hold down the macro button and it will go into super macro mode.

How do you set flash mode?

Adjust the shooting mode dial to a shooting mode that allows for flash mode. Then push menu, and use the down arrow to select flash adjust and then use the left and right arrow keys to select the flash mode you want.

I use a Canon PowerShot S3 IS


Roger M. Marty CIOS 258 Lesson 4

I use a Nikon D200. Following are my replies to Week 4 questions.

How do you adjust the ISO?
Press the ISO button on the top left and rotate the Main Control Dial
How do you adjust the white balance?
Press the WB buttom on the top left and rotate the Main Control Dial.
How do you set exposure compensation?
Press the Exposure Compensation button on the top right and rotate the Main Control Dial.
How do you set file size and compression?
Press the QUAL button on the top left and rotate the Main Contrl Dial.
How do you set the exposure meter mode?
Select P, S, A or M in the top LCD display.
How do you set macro focusing?
Set the focus dial on the front left side to Manual.
How do you set the flash mode?
Flash mode can be selected from TTL, Manual, Repeating Flash and Commander Mode.

Next weeks assignment

For next week do the assignment that was scheduled. We will cover the concepts in class, but by wrestling with the assignment you will be better prepared. Doing the assignment will create "learning opportunities!"

10/03

10/10

Week 4: Taking Photographs: How does the camera work?

If you do not have a camera, see me.

Read your camera manual and answer the following questions. If you do not have the manual you can probably find one using a Google search.

How do you adjust the ISO?

How do you adjust white balance?

How do you set exposure compensation?

How do you set file size and compression?

How do you set the exposure meter mode?

How do you set macro focusing?

How do you set the flash mode?

Post your desciption to the course web log.

Bring your camera and your camera manual to class

100

20

Adobe Photoshop Elements 6: Full Review - Review by PC Magazine

Adobe Photoshop Elements 6: Full Review - Review by PC Magazine
If you can not afford Photoshop, or even if you can, I recommend Adobe Photoshop Elements. I have used Elements for years and it keeps getting better. I also recommend that you download and install Picasa because of its excellent sharing capability. A final alternative is Adobe Lightroom, but for Lightroom there are times where you will still need Photoshop or Photoshop Elements, for example correcting converging verticals. Actually I use all four alternatives and find that each has specific uses that can not be duplicated by the others.

Thursday, October 04, 2007

DPexpert: [ BEWARE THE PIXEL PEEPER ]

DPexpert: [ BEWARE THE PIXEL PEEPER ]
Not all that is written by experts is relevant or even useful. Over time, when a new camera is introduced, there will be common threads of criticism. It seems to happen to every camera. After awhile it becomes almost funny. Common critical themes include color balance, back focus, a tendency to under or over expose, noise reduction, and slow raw speed. The old camera will be better then the new, the new will be better then the old, another camera is better then both the new and the old, it will drive you crazy. What is important it that you define your own preferences, what do you want to do with your camera and that you know how much you want to spend. If you know your intended use, and you budget, then the reviews can be valuable, but keep a clear sense of purpose in order not to get lost in an ocean of contridictory opinion.

Wednesday, October 03, 2007

photographer and picture (Josh Cole)

Josh Cole is the photographer that i have selected to type about. I like his ideas for pictures and the my favorite photographer so far. I really like how the picture i selected by him has an acoustic base upside down with to guys just hanging out. I can relate to this picture because i am a musician like they are.

http://photographers.com/joshcole/Library/thumb_1067967470_1852cbeae1_o.jpg?xvostik=1234724252

My favortie photo on photographer


I have always had a thing for landspace pics so i just did a google search and this one was on the first page. I picked it for my favorite becuase i love how the mountains are reflected in the water and it reminds me of a lake in glacier park, montana where my dad worked for a few summer. It brings back all the fun we had fishing and hiking around there. The photographer is Steven Pinker, i chose him becuase his section on the canadian rockies really reminded me of my old home in montana.

My favorite photo and photographer


I really like this picture because I love water and because it beautifully captures the fun this kid is having. Some of those who commented on it believed it to be too busy, by this I infer they must mean the boats. But I disagree, if the boats weren't there it would seem too staged. Of course obviously it is, but it feels more like he is just jumping in for a swim at the local pier instead of just some random lake. The silhouette effect is great.
I found Philip J. Monahan on Flickr and really like his photography. My favorite ones and what I think to be his true strength in his photos, is capturing not only the beauty of nature, but grandeur. I suggest having a look yourselves. http://flickr.com/people/phijomo/

Tuesday, October 02, 2007

Favorite Photo and Photographer


Here is a photo I found on Deviantart.com under their photography section. DeviantART has mostly amateur artists, but there are so many that there are bound to be really good ones. I really liked how the arch set up the photo almost as if you were peering into a strange distant world that existed only through and under the archway. The colors are also very vibrant and surreal, maybe thats why I think it looks so distant and otherworldly.

For my photographer I picked Karekin Goekjian. He is originally from Georgia, the country, not the state. He takes a lot of photos by moonlight. I'm not sure of his exact technique, but he usually has long exposures and will often use lights to fill in colors or influence the picture. Many of his photos have very interesting lighting and eye catching textures and colors. On his website, there are several galleries, my favorite being the Southern Ruins. I wish that they would link to large versions, because the images are really too small to see the detail.

http://www.karekingoekjian.com/

Single photograph that I like,& the photographer

Looking thru all the other photograhers, was hard to choose what I like the most. All of the pictures I like . I chose this one, for the reflection of light, for the serenity of the picture , the refelction it gave in the water showed clearly identical picture of the mountain.
To me that is amazing, besides this one I also like the rest of his pictures.
Photograher Galen Rowell, is a famous photographer , known for his Art of the Possible.. each one of them has that unique ways of showing the pictures.Dangerous & risky & you can see what he is feeling while taking those pictures.
I can just imagine what is to be right there ...

When you read how he had taken certain picture.Many times , not only does he sets the camera on a certain speed or shutter or aperture, you can see the patience he had in capturing the picture. link is www.monutainlight.com/

Photo & Photographer I like

I have always wanted to ride in an air balloon. When I saw this picture in black & white with a colored reflection it reminded me of how different the world looks when you are in the air. The picture seems a little blurry, but it is well centered on the frame.

http://www.betterphoto.com/gallery/dynoGall2.asp?catID=251&pageID=3&rows=12&contestCatID=&camID=

My favorite photographer is Joseph Rossbach. http://www.josephrossbach.com/
He takes pictures of the American Landscape with a concentration in wilderness, threatened environments, and protected parks and monuments. His hope is that his images inspire and educate others to preserve the natural world. I also enjoy taking landscape pictures.

Monday, October 01, 2007

The Online Photographer: How to use Flickr

The Online Photographer: How to use Flickr
An excellent article, appropriate to this weeks assignment. I will share this in class.
Steve

My Favorite Picture & Photographer

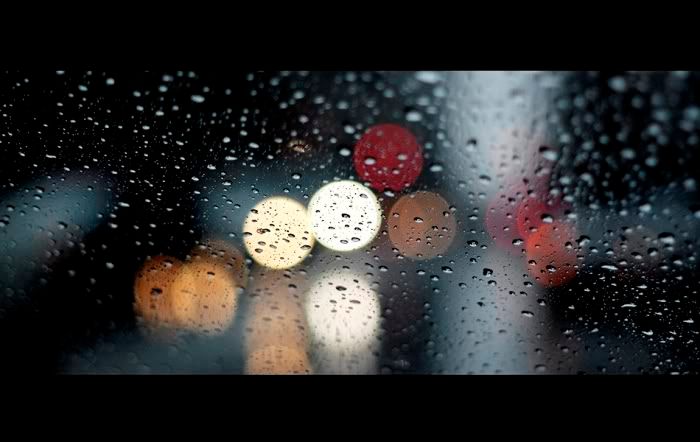
I really like this picture because of the focus that the lens is in to capture the detail of the rain drops and to blur the background street lights into perfect spheres. I love how that light is captured in the picture and that is seems as though it was taken out of a window through a wide perseption. I don't know who the photographer is because I came across this picture over the web and was inspired by it.
This is how I would like to portray a rainy night
through a photographic lens.


I love Anne Geddes work and I know that I'm not the only one. She is a very popular photographer, but more so of her work with children. She knows just how to capture a child's beauty and innocense through a picture wether they are 3 years old or 3 days old. Anne has a way of decorationg a child through colors, shapes and light that makes you want one! Her unique, signature style of playfully previewing children in photographs is what she is most famous for. I hope to adopt the same class and technique that she portrays.


Lesson 3, favorite photographer(s) TC

One of my favorite photographers, is Annie Leibovitz. She does alot of celebrity photos. She also does work for the TIMES, NYTIMES, Rolling Stone, Vanity Fair, American Vogue and so much more! She has a book, called "Women" which features diffrent photos of diffrent women, a fantastic collection of photos. I looked through this particular book, and the several diffrent set-ups Leibovitz used to create the photograph is amazing. Very emotional and Thought-provoking... here are a couple of websites you can view some of her work.

http://www.temple.edu/photo/photographers/leibovitz/photos.html

http://en.wikipedia.org/wiki/Annie_Leibovitz

http://www.style.com/vogue/feature/120103/popup/slideshow1.html

http://www.andrewsmithgallery.com/exhibitions/annieleibovitz/americanmusic/index.htm

____________________________________________
There are other photographers that i would like to also mention:
Galen Rowell (does excellent work in photographing the scenic views)

http://www.mountainlight.com/gallery.html

Nick Kelsh
http://72.10.35.23/

http://www.shutterbug.net/refreshercourse/portrait_tips/1103career/index1.html

Tim Fitzharris

http://www.timfitzharris.com/

Doreen Beers-Michel

http://www.doreenbeers-michel.com/index2.php

Michelle Carr
http://www.michellecarrphotography.com/

Amy Johnson

http://www.amyjohnsonphotography.com/

Kristie Chadwick

http://www.chadwickzone.com/index.htm

Anne Geddes (personal favorite!)

http://www.annegeddes.com/

Maragret Bryant

http://www.bryantdogphotography.com/index.php


_____________________________________________

So these are only a handful of the websites of photographers i found an interest in!

terri.

Photograph: a picture painted by the sun without instruction in art. ~Ambrose Bierce

You don't take a photograph. You ask, quietly, to borrow it. ~Author Unknown

Sometimes I do get to places just when God's ready to have somebody click the shutter. ~Ansel Adams

No place is boring, if you've had a good night's sleep and have a pocket full of unexposed film. ~Robert Adams, Darkroom & Creative Camera Techniques, May 1995

It's weird that photographers spend years or even a whole lifetime, trying to capture moments that added together, don't even amount to a couple of hours. ~James Lalropui Keivom

If you're photographing in color you show the color of their clothes - if you use black and white, you will show the color of their soul. ~Author Unknown

There are always two people in every picture: the photographer and the viewer. ~Ansel Adams